MIG welding aluminum can seem like a puzzle even for experienced welders. Because of aluminum’s distinct properties—high thermal conductivity, oxide skin, low melting point—it demands a careful approach. In this guide, you’ll find clarity on how to select the right filler metal, optimize wire-feeding systems, control heat input and set up your MIG welding system for success. Whether you're a seasoned pro or just starting out, these insights will help you get better aluminum welds.

I. The Basics of Welding Aluminum
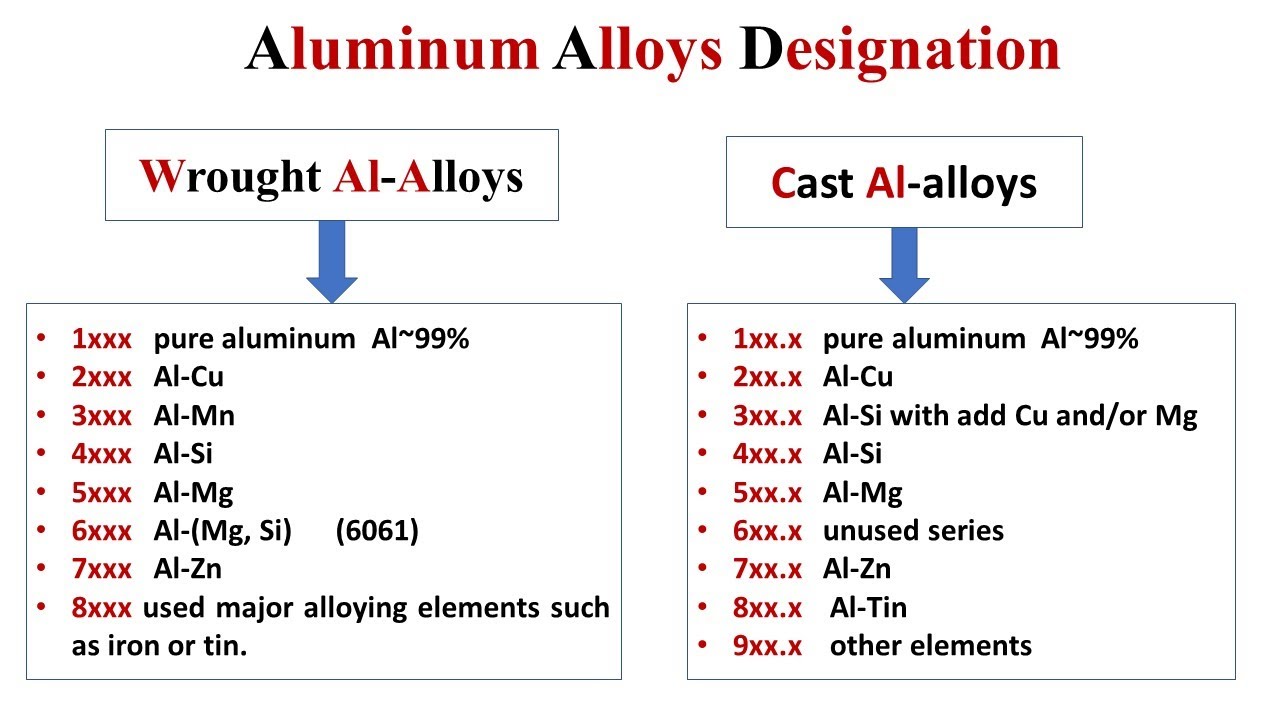
Aluminum is a lightweight metal widely used across various industries, from aerospace to automotive. However, in its pure form, aluminum is relatively soft, which limits its applications. To enhance its strength and tailor its properties for specific uses, aluminum is often alloyed with other elements, such as copper, magnesium, silicon, manganese, and zinc. These alloys are categorized into series based on their primary alloying elements, which include:
1) Wrought Aluminum Alloy Series:

1xxx Series: Contains a minimum of 99% aluminum purity, known for excellent corrosion resistance and high thermal and electrical conductivity.
2xxx Series: Alloyed primarily with copper, offering high strength but lower corrosion resistance.
3xxx Series: Manganese is the main alloying element, providing good corrosion resistance and moderate strength.
4xxx Series: Silicon is added to lower the melting point, making it suitable for welding.
5xxx Series: Magnesium is the primary alloying element, known for its excellent corrosion resistance and weldability.
7xxx Series: Zinc is the main alloying element, offering high strength but lower weldability.
8xxx Series: Other elements are added for specific applications.
2) Unique Challenges of Aluminum Welding:
Welding aluminum—especially thin‐gauge material—poses challenges:
High thermal conductivity means the heat dissipates quickly, making arc initiation and puddle maintenance harder.
The oxide layer on aluminum melts at a much higher temperature than the base aluminum, which must be broken through to initiate the weld.
Because of the low melting point and high heat conduction, controlling heat input is critical to avoid burn‐through and distortion.
Feeding soft aluminum wire can be more problematic: bird‐nests, feeding inconsistencies and liner/delivery issues are common.
For specific solutions, you can also read Aluminum Alloy Welding Common Problems and Solutions.
II. Frequently Asked Questions
1) What is the Best Wire for Welding Aluminum?
Choosing the right filler metal for aluminum welding is crucial for achieving strong, reliable welds. Unlike steel, where filler metal is typically selected based on matching tensile strengths, aluminum requires a more nuanced approach. When selecting a filler metal, consider the following factors:
Base Metal Composition: The filler should complement the base metal to ensure strong welds.
Ease of Welding: Some fillers are easier to work with than others, affecting the overall welding process.
Joint Design: The design of the joint can influence filler selection and welding technique.
Dilution occurs when the filler wire and base metal combine in the weld puddle, altering the weld's chemical makeup.
Strength of the Weld: It's essential to match the strength of the filler with the base metal.
Hot Cracking Sensitivity: Some fillers are more prone to cracking under heat.
Ductility: The ability of the weld to deform without breaking is vital for certain applications.
Corrosion Resistance: Consider the environment in which the weld will be used.
Color Matching: This is especially important if the material is anodized.
Elevated Service Temperature: Consider the temperature range the weld will face (typically between 150°F and 350°F).
Different filler metals address these considerations to varying degrees. In general, if strength is the primary consideration, the filler metal should closely match the base metal in terms of tensile, yield, and ductility.
Most consumable manufacturers and the American Welding Society (AWS) provide information listing the relative values of these considerations for their filler metals corresponding to each base alloy. Always refer to an aluminum filler metal selection chart to evaluate the above weld properties.
2) Are There Any General-Purpose Aluminum Welding Wires?
Yes — traditionally, AWS ER4043 (silicon‐based) and ER5356 (magnesium‐based) are the go-to wires for many aluminum alloys.
4043 is generally more fluid, easier to feed, works well for many general alloys, and is more forgiving.
5356 offers higher strength in many conditions, but is more demanding in feeding and technique.
Recent developments have introduced alternative wires with improved strength and feed characteristics. For example, some newer wires claim ~20 % higher tensile strength than 4043 while maintaining feedability. These may be beneficial when strength and joint integrity are critical rather than cost alone.
3) How Important is Proper Equipment for Welding Aluminum?
When it comes to welding aluminum, having the right equipment is essential. Unlike steel, aluminum’s low melting point and high thermal conductivity require specific considerations:

Machine Selection: You'll need a MIG welder with sufficient power and the ability to handle aluminum wire, typically .030 or .035 inches in diameter for most applications. A welder with an adjustable output and a stable arc is also essential. You can go through the Megmeet MIG/MAG welding machines list to choose an ideal one.
Wire‐feeding mechanism: Because aluminum wire is softer and more prone to feeding issues, systems like spool guns, push-pull feeders, or continuous feed systems are often used.
Torch and Consumables: Use a proper torch designed for aluminum, correct liners (PTFE or Teflon liner reduces friction), U-groove drive rolls for soft wire, and a clean liner path. Also contact tips and nozzles suited for aluminum.
Gas supply & shielding: Because aluminum welding is more sensitive to contamination, a consistent flow of shielding gas (arg or arg/He blends) and proper gas coverage are critical.
Investing in equipment tailored for aluminum can improve weld quality and enhance productivity and ease of use.
4) What Wire Feeding System is Best for Aluminum?
The choice between a push-pull system, spool gun, and continuous-feed push system can greatly impact your aluminum welding experience, each with unique advantages:
Spool Gun:
Design: Spool guns are compact, lightweight devices that allow welders to control wire feed at the gun directly.
Use Case: These are ideal for shorter runs and less demanding applications. They typically come equipped with a small spool of filler wire.
Advantages: Simplifies feeding, reduces the chance of wire tangles, and allows for easy handling of small jobs.
Limitations: More expensive per pound of filler metal because they generally utilize smaller spools, and frequent spool changes can become time-consuming.
Push-Pull Gun:
Design: This system uses two motors: one to push the wire from the feeder and another to pull it through the gun.
Use Case: Best for longer runs (up to 50 feet) and high-volume welding scenarios.
Advantages: Maintains consistent wire feed, reducing the chances of feeding issues and allowing the use of larger spools, which results in lower cost per pound of filler wire. The increased productivity often offsets the higher initial investment.
Limitations: Higher upfront cost compared to spool guns.
Continuous-Feed Push System:
Design: This newer innovation uses a continuous drive system that maintains constant contact with the wire.
Use Case: Suitable for applications where length requirements are moderate (up to 15 feet).
Advantages: Reduced complexity, potential for less birdnesting, and lighter-weight design.
Limitations: The limited distance may not suit every project, especially those requiring extensive length.
Ultimately, for high-volume use, the push-pull system tends to provide the best return on investment due to its ability to handle larger spools and its efficiency in wire feeding. However, for smaller, more frequent projects, spool guns can be more practical.
5) Which Transfer Mode Should I Use for MIG Welding Aluminum?
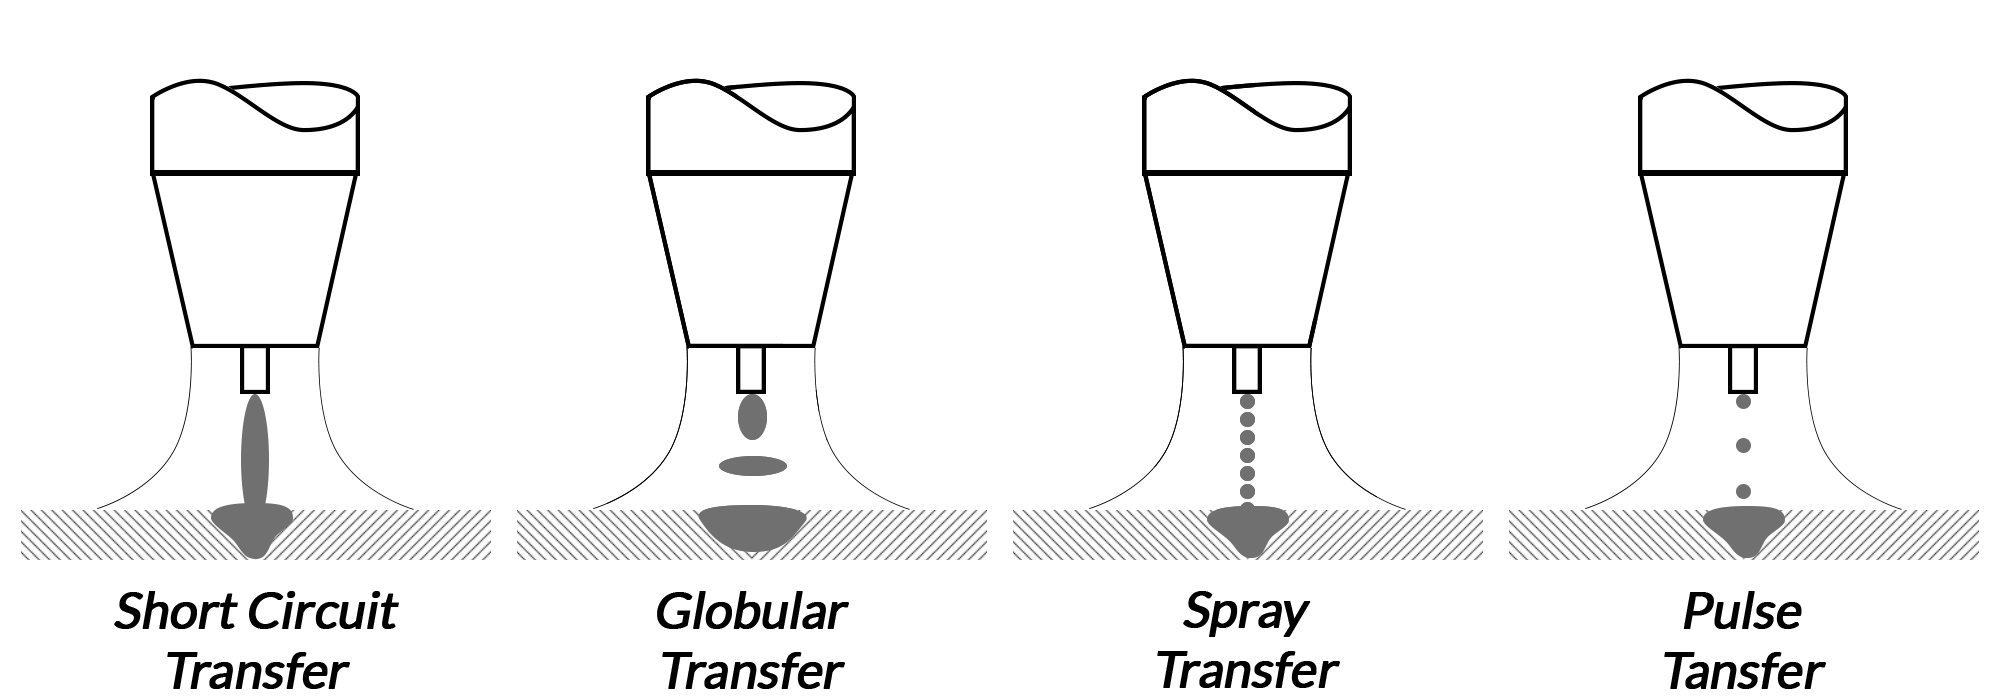
Selecting the appropriate transfer mode is crucial for achieving high-quality aluminum welds. The most common modes are short-circuit transfer, spray transfer, and pulsed MIG.

Short-Circuit Transfer:
Details: In this mode, the wire touches the weld puddle, causing a short circuit, which rapidly cools down.
Drawbacks: Short-circuit transfer is not recommended for aluminum due to poor fusion and high susceptibility to cracks and warping.
Spray Transfer:
Details: Molten droplets are transferred from the electrode to the puddle, creating a continuous and stable arc.
Advantages: This mode produces aesthetically pleasing, high-quality welds with good fusion at the edges, making it suitable for thicker materials.
Drawbacks: Higher heat input can lead to burn-through in thinner materials (1/8 inch or less), so increased travel speed and the use of thinner-gauge filler wires (.030-inch) are necessary.
Pulsed MIG:
Details: In pulsed MIG welding, the machine alternates between a high current to create a spray transfer and a low current that allows the puddle to cool.
Advantages: This method provides better heat control and can effectively reduce burn-through on thin materials while still maintaining high deposition rates. It’s great for out-of-position welding and creates cleaner, more aesthetically pleasing welds that rival those done with TIG.
Overall Suitability: Pulsed MIG is an attractive alternative for both beginners and experienced welders due to its ease of use, especially for applications involving thinner materials where burn-through is a concern.
6) What Are the Cost Considerations When Choosing a Welding System?
When evaluating the costs associated with aluminum welding, several factors come into play:
Filler Metal Costs: The price difference between small and large spools can be significant. For example, a 1-pound spool may cost 11.46, while a 16−pound spool may only be 170.24. This leads to a cost difference of $0.82 per pound, making larger spools a more economical choice for bulk work.
Time and Efficiency: Changing spools regularly can consume valuable time. If a welder spends five minutes changing spools for a 1-pound wire versus a single change for a 16-pound spool, that adds up. For every 16 pounds of filler wire, that results in 80 minutes of extra work that could have been spent welding.
Overall Productivity: With push-pull systems, the initial investment may be higher, but the reduction in downtime and the ability to use larger, more cost-effective spools often provide a quick return on investment due to increased throughput and reduced labor costs.
III. Best Practices for MIG Welding Aluminum
Now that we’ve addressed some of the key questions and considerations, here are some best practices to help you maximize your success in MIG welding aluminum:

1) Prepare Your Work Area
Ensure the workspace is clean and free from contamination. Aluminum oxide and residual oils/hydrocarbons hamper weld quality.
Use a stainless‐steel wire brush dedicated for aluminum; don’t use carbon steel brushes that can leave embedded iron contamination.
2) Set Up Your Equipment Properly
Confirm that your MIG machine and feeder are suitable for aluminum with correct polarity (DCEP for most aluminum MIG setups) and machine settings.
Adjust voltage and wire feed speed: for aluminum, wire feed speed often needs to be 30–100% higher than for steel for similar thickness.
Ensure the liner is straight, size is correct (PTFE/Teflon liner for aluminum), drive rolls are U-groove and set with correct tension.
Match shielding gas: for many aluminum MIG jobs 100% argon is standard; for thicker material or where porosity is an issue, argon/helium blends may be used.
3) Use the Right Techniques
Maintain a consistent travel speed and torch angle to keep a uniform weld puddle. Too slow can over-heat; too fast means poor fusion.
Pay attention to torch/workstick‐out (distance of wire tip to puddle) – excessive stick-out leads to poor gas coverage and inconsistent metal transfer.
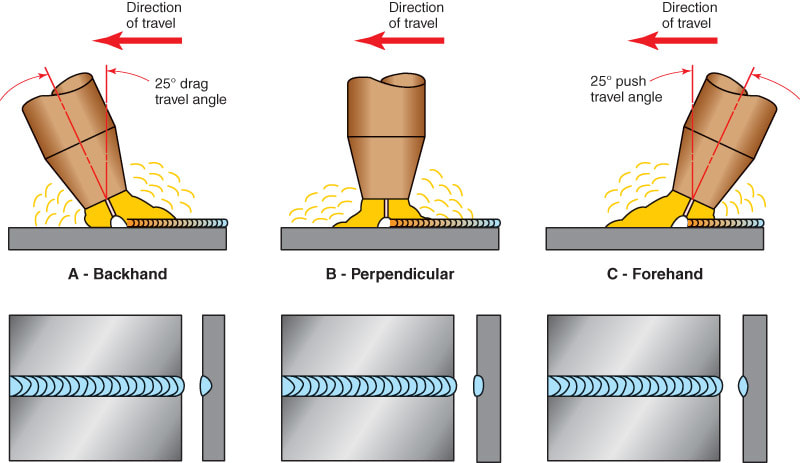
Use the correct gun angle and motion. For example, a push technique with slight angle works well in many cases.
4) Manage Heat Input
Because aluminum conducts heat away rapidly, you must carefully control heat input. On thin materials, use faster travel speed, smaller wire diameter (.030″), possibly pulsed mode to reduce heat build-up.
Preheat only if required (for thicker sections); avoid unnecessary heating that will cause distortion or loss of properties.
5) Monitor and Adjust Parameters
Check for bird-nests, wire feed issues, soft feedings or liner kinks—these are common with aluminum wire.
Adjust wire feed speed and voltage incrementally if you see poor penetration, porosity or inconsistent bead.
Watch for spatter, undercut or burn‐through – all may signal too much heat, wrong travel speed or wrong wire size.
6) Conduct Regular Maintenance
Clean and inspect liners, drive rolls, contact tips and torch nozzle regularly. Aluminum particulate and soft wire debris cause feed issues quickly.
Keep your gas hoses, regulator flow, nozzle and tip clean for uncompromised gas coverage.
By mastering the fundamentals of aluminum MIG welding—including filler‐metal selection, wire feeding systems, transfer modes and cost considerations—you position yourself for more efficient, reliable welds. Pair this knowledge with hands-on practice and you’ll significantly improve your outcomes. The key to success with MIG welding aluminum lies in the intersection of equipment, technique and consistent process control.
If you’re ready to step up your aluminum welding performance, start applying these best practices today and monitor the improvements in weld quality, speed and reliability.
Related articles:
1. AC TIG Welders for Aluminum Welding
2. MIG and TIG Guidelines for Aluminum Welding
3. Pulsed MIG Welding Aluminum and Stainless Steel
4. Why is AC current preferred in aluminum welding?
5. How to Successfully MIG Weld Aluminum [Guide]?


