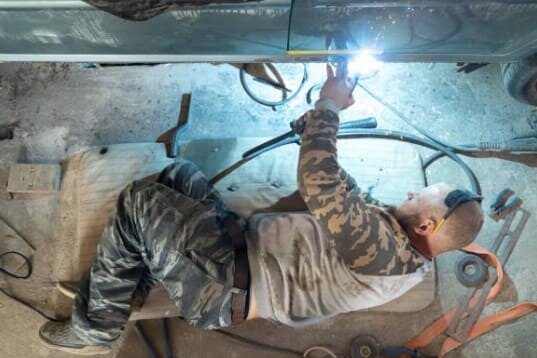
Overhead arc welding is one of the most challenging yet valuable welding positions, often required in industrial and construction settings. Welding overhead demands precision, skill, and the right techniques to ensure strong, durable welds. In this guide, we’ll explore the ins and outs of overhead arc welding, including its benefits, step-by-step process, and expert tips to help you master this essential welding technique.

I. What is Overhead Arc Welding?
Overhead arc welding involves welding joints in the overhead position, where the welder works against gravity. This position is common in industries like construction, shipbuilding, and pipeline welding, where the workpiece cannot be easily moved or repositioned. Overhead welding can be performed using various arc welding processes, such as:
Shielded Metal Arc Welding (SMAW): Uses a consumable electrode covered in flux.
Gas Metal Arc Welding (GMAW): Employs a continuous wire electrode and inert gas shielding.
Flux-Cored Arc Welding (FCAW): Combines elements of SMAW and GMAW for versatility.
Gas Tungsten Arc Welding (GTAW): Uses a non-consumable tungsten electrode for high-precision welds.
Each process has its own advantages, depending on the material, thickness, and desired weld quality.
II. Why Use Overhead Arc Welding?
Overhead arc welding is often necessary when the workpiece is fixed in place, such as in structural steelwork, bridges, or large machinery. The benefits of overhead welding include:
Improved Joint Accessibility: Allows welding in hard-to-reach areas without moving the workpiece.
Reduced Distortion: The heat input is distributed more evenly, minimizing warping and shrinkage.
Cost Efficiency: Eliminates the need for expensive scaffolding or repositioning equipment.
Enhanced Weld Quality: Produces stronger, more uniform welds with less porosity and slag inclusion.
III. How to Perform Overhead Arc Welding: A Step-by-Step Guide
Mastering overhead arc welding requires careful preparation, the right equipment, and a solid technique. Follow these steps to achieve professional results:
1. Choose the Right Equipment:
Welding Process: Select the appropriate arc welding method (SMAW, GMAW, FCAW, or GTAW) based on the material and application.
Electrode/Wire: Use a smaller-diameter electrode or wire to reduce heat input and improve control.
Power Source: Adjust the amperage and voltage settings to suit the material thickness and welding position.
PPE: Wear a welding helmet with a dark shade lens, gloves, and flame-resistant clothing to protect against sparks and radiation.
2. Prepare the Workpiece:
Clean the metal surface of dirt, oil, rust, or paint to ensure proper fusion.
Align and clamp the pieces securely to maintain the joint gap and prevent movement during welding.
Use a backing strip or bar to support the molten metal and prevent burn-through.
3. Position Yourself Safely:
4. Strike the Arc and Weld:
Striking the Arc: Touch the electrode to the base metal and pull it back quickly to establish the arc.
Welding Technique: Use a drag (pull) technique to maintain better control of the weld pool. Move the electrode steadily along the joint, keeping a short arc length.
Weaving: Gently weave the electrode side-to-side to fill the joint evenly and prevent sagging.
5. Inspect and Clean the Weld:
Visually inspect the weld for defects like cracks, porosity, or lack of fusion.
Remove slag and excess metal using a wire brush, grinder, or chipping hammer.
IV. Tips and Tricks for Overhead Arc Welding
To improve your overhead welding skills and achieve professional results, consider these expert tips:
Use a Fast-Freeze Electrode: A fast-freeze electrode solidifies quickly, reducing sagging and creating a flatter weld bead.
Maintain a Short Arc Length: This reduces heat input and helps control the weld pool.
Practice on Scrap Metal: Before welding the actual workpiece, practice on scrap metal to refine your technique.
Use Lower Amperage: Overhead welding typically requires lower amperage to prevent overheating and burn-through.
Stay Comfortable: Take regular breaks to avoid fatigue, as overhead welding can be physically demanding.
V. Common Challenges in Overhead Arc Welding
Overhead welding presents unique challenges, including:
Gravity: Molten metal can sag or drop, requiring precise control of the weld pool.
Visibility: The overhead position can make it difficult to see the weld pool clearly.
Heat Management: Excess heat can lead to distortion or burn-through, especially in thin materials.
By using the right equipment, techniques, and practices, you can overcome these challenges and achieve high-quality welds.
VI. Conclusion
Overhead arc welding is a valuable skill for any welder, offering versatility and efficiency in a wide range of industrial applications. While it presents unique challenges, mastering this technique can enhance your welding capabilities and open up new opportunities in construction, manufacturing, and repair work. With practice, patience, and the right approach, you can produce strong, durable welds in even the most demanding overhead positions.
FAQs:
1. What is the best welding process for overhead welding?
2. How do I prevent molten metal from sagging?
3. Is overhead welding dangerous?
4. Can I use TIG welding for overhead positions?
Related articles:
1. How to Master 2FG Position Welding: A Comprehensive Guide
2. Everything You Need to Know on Welds, Symbols, and Positions
3. Welding Positions and Joint Types: 1G, 2G, 3G, 4G, 5G, and 6G
4. Tips for Out-of-position Welding
5. What are the 4 Basic Welding Positions and How to Choose the Right One?


