MIG welding is a versatile and popular welding process that can be used for various applications, such as fabrication, repair, and hobby projects. MIG welding involves feeding a continuous wire electrode through a welding gun and creating an arc between the wire and the workpiece. The arc melts the wire and the base metal, forming a weld pool that cools and solidifies into a strong joint.
However, MIG welding is not as simple as just pulling the trigger and moving the gun along the joint. Many factors affect the quality and appearance of your weld, such as the machine settings, the joint preparation, the shielding gas, and the welding technique.
One of the most important aspects of the MIG welding technique is the weld pattern. The weld pattern is the way you move the welding gun along the joint, creating a series of overlapping beads that form the weld. The weld pattern can influence the penetration, appearance, speed, and distortion of your weld.
There are many different weld patterns that you can use for MIG welding, but not all of them are suitable for every situation. In this article, we will introduce you to six common MIG weld patterns and explain when and how to use them for your project.
I. The Stringer Weld Pattern
The stringer weld pattern is the simplest and most basic weld pattern for MIG welding. It involves moving the welding gun in a straight line along the joint, without any side-to-side motion. The stringer weld pattern produces a narrow and smooth bead that has good penetration and fast travel speed.

The stringer weld pattern is ideal for beginners as it is easy to perform and requires minimal movement. It is also suitable for thin materials, as it reduces the risk of burn-through and distortion. You can use the stringer weld pattern for any joint type and any position, as long as you adjust your machine settings accordingly.
To perform the stringer weld pattern, you need to point your welding gun at 90 degrees to a butt joint and 45 degrees to all other joint types. You can push or pull the direction of travel, depending on your preference and the type of shielding gas you use. The angle of travel should be between 10 and 20 degrees from perpendicular to the joint.
You need to start by creating a stable arc and a fluid weld pool at the beginning of the joint. Then, you need to move the welding gun steadily along the joint, keeping a consistent distance between the nozzle and the workpiece. You need to watch the width of your weld pool and keep it uniform throughout the weld.
II. The Circle Weld Pattern
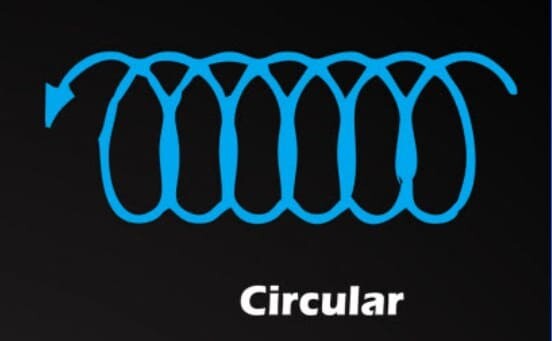
The circle weld pattern is a more advanced weld pattern that involves moving the welding gun in small circles along the joint. The circle weld pattern produces a wider and flatter bead that has shallow penetration and slower travel speed.

The circle weld pattern is more difficult to perform than the stringer pattern, as it requires more movement and coordination. However, it can create a more aesthetically pleasing weld that has better fusion at the edges of the joint. It can also help prevent undercutting and slag entrapment, which are common defects in MIG welding.
The circle weld pattern is suitable for thicker materials, as it spreads out the heat and reduces distortion. It is also useful for vertical up welding, as it helps control the sagging of the weld pool. You can use the circle weld pattern for butt joints in any position except horizontal, vertical up lap joints, and vertical up corner joints.
To perform the circle weld pattern, you need to point your welding gun at 90 degrees to a butt joint and 45 degrees to all other joint types. You can push or pull the direction of travel, depending on your preference and the type of shielding gas you use. The angle of travel should be between 10 to 20 degrees from perpendicular to the joint.
You need to start by creating a stable arc and a fluid weld pool at the beginning of the joint. Then, you need to move the welding gun in small circles along the joint, overlapping each circle by about half its diameter. You need to keep the circles tight and consistent in size and shape throughout the weld.
III. The Weave Weld Pattern
The weave weld pattern is another advanced weld pattern that involves moving the welding gun from side to side along the joint. The weave weld pattern produces a wide and convex bead that has moderate penetration and slow travel speed.
The weave weld pattern is more challenging to perform than the stringer or circle patterns, as it requires more movement and timing. However, it can create a strong and uniform weld that covers a large area and fills gaps in the joint. It can also help avoid cold lap, which is a defect where the weld metal does not fuse properly with the base metal.
The weave weld pattern is suitable for thick materials, as it distributes the heat and reduces distortion. It is also useful for horizontal and vertical down welding, as it helps control the flow of the weld pool. You can use the weave weld pattern for butt joints in any position, horizontal lap joints, and horizontal corner joints.
To perform the weave weld pattern, you need to point your welding gun at 90 degrees to a butt joint and 45 degrees to all other joint types. You can push or pull the direction of travel, depending on your preference and the type of shielding gas you use. The angle of travel should be between 10 to 20 degrees from perpendicular to the joint.
You need to start by creating a stable arc and a fluid weld pool at the beginning of the joint. Then, you need to move the welding gun from side to side along the joint, pausing slightly at each edge of the joint. You need to keep the width of your weave consistent throughout the weld and avoid weaving too wide or too fast.
IV. The Whipping Weld Pattern
The whipping weld pattern is a variation of the weave weld pattern that involves moving the welding gun back and forth along the joint. The whipping weld pattern produces a series of overlapping beads that have deep penetration and fast travel speed.
The whipping weld pattern is easier to perform than the weave weld pattern, as it requires less movement and timing. However, it can create a rough and irregular weld that may have porosity and lack of fusion. It can also cause more spatter and distortion than other weld patterns.
The whipping weld pattern is suitable for thick materials that require deep penetration, such as pipe welding. It is also useful for vertical up welding, as it helps control the sagging of the weld pool. You can use the whipping weld pattern for butt joints in any position, vertical up lap joints, and vertical up corner joints.
To perform the whipping weld pattern, you need to point your welding gun at 90 degrees to a butt joint and 45 degrees to all other joint types. You can push or pull the direction of travel, depending on your preference and the type of shielding gas you use. The angle of travel should be between 10 to 20 degrees from perpendicular to the joint.
You need to start by creating a stable arc and a fluid weld pool at the beginning of the joint. Then, you need to move the welding gun back and forth along the joint, pulling the gun away from the workpiece slightly at each forward motion and pushing it closer to the workpiece slightly at each backward motion. You need to keep the length and frequency of your whips consistent throughout the weld.
V. The Figure 8 Weld Pattern
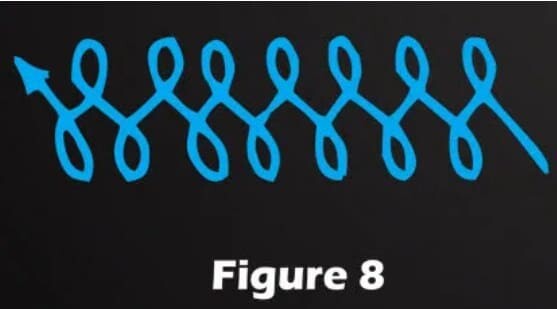
The Figure 8 weld pattern is a complex weld pattern that involves moving the welding gun in a figure 8 shape along the joint. The Figure 8 weld pattern produces a wide and flat bead that has shallow penetration and slow travel speed.

The Figure 8 weld pattern is very difficult to perform, as it requires a lot of movement and coordination. However, it can create a very smooth and attractive weld that has excellent fusion at the edges of the joint. It can also help prevent undercutting and slag entrapment, which are common defects in MIG welding.
The Figure 8 weld pattern is suitable for thick materials, as it spreads out the heat and reduces distortion. It is also useful for vertical up welding, as it helps control the sagging of the weld pool. You can use the Figure 8 weld pattern for butt joints in any position except horizontal, vertical up lap joints, and vertical up corner joints.
To perform the Figure 8 weld pattern, you need to point your welding gun at 90 degrees to a butt joint and 45 degrees to all other joint types. You can push or pull the direction of travel, depending on your preference and the type of shielding gas you use. The angle of travel should be between 10 to 20 degrees from perpendicular to the joint.
You need to start by creating a stable arc and a fluid weld pool at the beginning of the joint. Then, you need to move the welding gun in a figure 8 shape along the joint, making sure that each loop of the figure 8 overlaps by about half its diameter. You need to keep the size and shape of your Figure 8 consistent throughout the weld.
VI. The J Weld Pattern
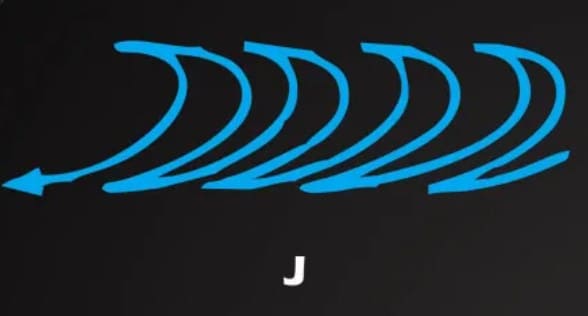
The J weld pattern is another complex weld pattern that involves moving the welding gun in a J shape along the joint. The J weld pattern produces a narrow and convex bead that has deep penetration and fast travel speed.

The J weld pattern is very difficult to perform, as it requires a lot of movement and coordination. However, it can create a strong and uniform weld that has good penetration into the root of the joint. It can also help avoid cold lap, which is a defect where the weld metal does not fuse properly with the base metal.
The J weld pattern is suitable for thin materials that require high penetration, such as sheet metal welding. It is also useful for horizontal and vertical down welding, as it helps control the flow of the weld pool. You can use the J weld pattern for butt joints in any position, horizontal lap joints, and horizontal corner joints.
To perform the J weld pattern, you need to point your welding gun at 90 degrees to a butt joint and 45 degrees to all other joint types. You can push or pull the direction of travel, depending on your preference and the type of shielding gas you use. The angle of travel should be between 10 to 20 degrees from perpendicular to the joint.
You need to start by creating a stable arc and a fluid weld pool at the beginning of the joint. Then, you need to move the welding gun in a J shape along the joint, making sure that the tail of the J follows the edge of the joint. You need to keep the size and shape of your J consistent throughout the weld.
Conclusion
MIG weld patterns are an important aspect of the MIG welding technique that can affect the quality and appearance of your weld. By choosing the right weld pattern for your project, you can improve your welding skills and achieve better results. In this article, we have introduced you to six common MIG weld patterns and explained when and how to use them. We hope you have learned something new and useful from this article.
If you are looking for a high-quality MIG welding machine that can help you create any weld pattern you want, we recommend you check out Megmeet Welding. Megmeet Welding is a leading manufacturer of welding equipment that offers a wide range of products, such as MIG welders, MAG welders, TIG welders, laser welders, and more. Megmeet Welding products are designed with advanced technology and features that can help you achieve optimal welding performance and efficiency. Whether you are a professional or a hobbyist, Megmeet Welding has the perfect welding solution for you.
To learn more about Megmeet Welding products and services, please visit the website or contact us today. You can also read their blog MIG Welding Tips From Megmeet for more tips and tricks on MIG welding and other welding topics. Megmeet Welding is your trusted partner for all your welding needs.

Related articles:
1. How to MIG weld different metal thicknesses?
2. Guide to Pulsed MIG Welding in Manufacturing
3. Advantages of Utilizing Pulsed MIG Welding for Aluminum
4. Tips for Setting MIG Welding Parameters for Thin Materials
5. Tips for Welding Sheet Metal With MIG or TIG


